Exposing Applications from Private Networks Using Cloudflare Tunnel
Applications running in private networks (home labs, NAT-restricted environments, or internal clusters) often need public accessibility without direct internet exposure. Cloudflare Tunnel provides a method to establish outbound-only connections that avoid inbound firewall rules and public IP requirements.
This post is for: System administrators and platform engineers managing applications in private networks who need external access without exposing infrastructure to direct internet traffic. Covers single-host Docker deployments and two Kubernetes approaches: simple service routing and advanced ingress integration.
TL;DR
Problem: Applications in private networks (behind NAT, in home labs, or internal clusters) need public access without exposing infrastructure to inbound connections.
Solution: Cloudflare Tunnel establishes outbound connections to Cloudflare’s edge network, which proxies external requests back through the tunnel.
Three deployment patterns:
- Docker Compose:
cloudflaredcontainer routes directly to application containers (Cloudflare-managed TLS) - Kubernetes + Service:
cloudflaredpod routes directly to Kubernetes services (Cloudflare-managed TLS, simple) - Kubernetes + Ingress:
cloudflaredpod routes through ingress controller (cluster-managed TLS, advanced)
Requirements:
- Cloudflare account with domain DNS managed by Cloudflare
- Outbound firewall access on port 7844 (QUIC over UDP by default, falls back to HTTP2 over TCP)
- For Example 3 (Kubernetes + Ingress): existing ingress controller with TLS certificate management
🔗 Cloudflare Tunnel Docs | Official Helm Charts
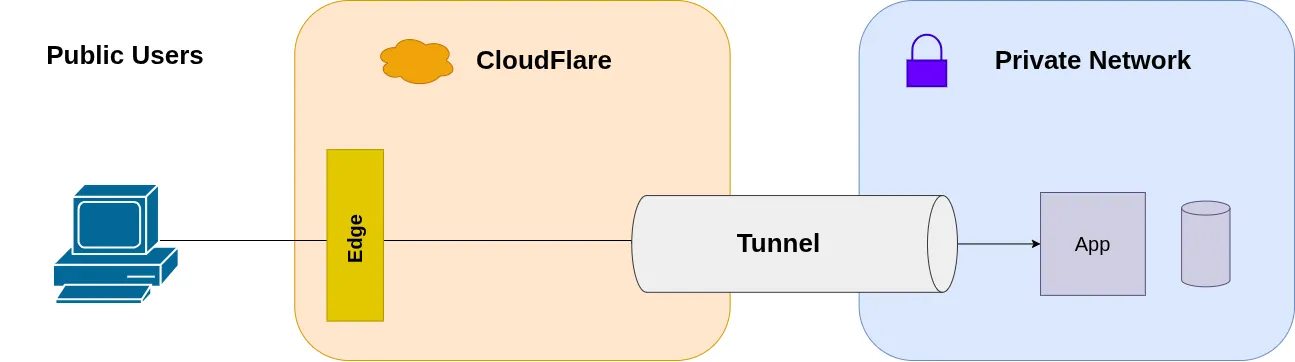
How Cloudflare Tunnel Works
Cloudflare Tunnel (formerly Argo Tunnel) reverses the traditional client-server model for network exposure. Instead of opening inbound ports and waiting for connections, a local daemon (cloudflared) initiates an outbound connection to Cloudflare’s edge network.
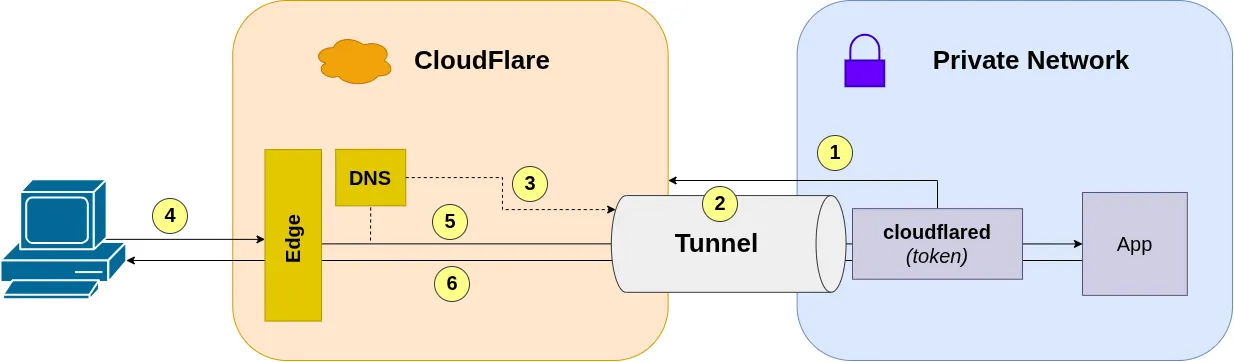
Connection flow:
- The
cloudflareddaemon authenticates with Cloudflare using a tunnel token - Establishes a persistent outbound connection to Cloudflare’s edge (port 7844, UDP or TCP)
- Cloudflare maps the tunnel to configured DNS routes
- External requests to the configured domain reach Cloudflare’s edge
- Cloudflare proxies requests through the tunnel to the internal application
- Responses follow the reverse path back to the client
This approach eliminates the need for:
- Inbound firewall rules
- Public IP addresses
- Port forwarding configurations
- Manual TLS certificate management (Cloudflare handles edge termination)
The trade-off is dependency on Cloudflare for DNS and edge routing, which may not be acceptable for all environments.
Example configuration:
- Log into the Cloudflare Zero Trust Dashboard
- Navigate to Networks → Connectors
- Click Create a tunnel and name it (e.g.,
my-app-tunnelork8s-cluster-tunnel) - Copy the tunnel token for later use
- Configure the Public Hostname routing:
- Subdomain: The subdomain for your application (e.g.,
app) - Domain: Your domain managed by Cloudflare (e.g.,
yourdomain.com) - Service: The target service URL (see deployment-specific instructions below)
- Subdomain: The subdomain for your application (e.g.,
Deployment Approaches
This article presents three deployment patterns, each suited to different infrastructure requirements:
- Docker Compose: Single-host deployments with Cloudflare-managed TLS
- Kubernetes + Service: Cluster deployments with Cloudflare-managed TLS (simple)
- Kubernetes + Ingress: Cluster deployments with cluster-managed TLS (advanced)
| Aspect | Docker Compose | Kubernetes + Service | Kubernetes + Ingress |
|---|---|---|---|
| Setup complexity | Low | Low | Medium |
| Certificate management | Cloudflare | Cloudflare | Cluster (cert-manager) |
| Routing | Direct to container | Direct to service | Via ingress controller |
| High availability | Single container | Multiple replicas | Multiple replicas |
| Use case | Single-host, dev/test | Simple K8s deployments | Existing ingress setup |
Example 1: Docker Compose
For single-host deployments where the application runs in Docker, cloudflared can be deployed as a sidecar container in the same Docker network. Both containers share a custom bridge network, isolating traffic from other containers on the host.
Docker Compose Configuration
Here’s a minimal docker-compose.yml that runs both your app and the Cloudflare tunnel:
version: '3.8'
services:  webapp:    image: your-app-image:latest    container_name: webapp    # Runs app on port 80    networks:      - app-network
  cloudflared:    image: cloudflare/cloudflared:latest    container_name: cloudflared    command: tunnel --no-autoupdate run    environment:      - TUNNEL_TOKEN=${TUNNEL_TOKEN}    networks:      - app-network    restart: unless-stopped
networks:  app-network:    driver: bridge
Configuration notes:
cloudflareduses Docker’s internal DNS to resolve container names (e.g.,webapp)- The custom
app-networkbridge network isolates containers in this compose stack from other Docker containers on the host. - The tunnel token authenticates the connection to Cloudflare’s edge
restart: unless-stoppedensures the tunnel restarts after system reboots
Cloudflare dashboard configuration for Docker Compose:
In the tunnel’s Public Hostname settings, configure:
- Service Type:
HTTP(for internal container communication) - Service URL:
webapp:80(container name and port - adjust the port to match your application)
The service URL uses Docker’s internal DNS, where webapp is the container name from the compose file and 80 is the port your application listens on inside the container.

Environment Configuration
Create a .env file next to your compose file:
TUNNEL_TOKEN=your-tunnel-token-from-cloudflareAdd .env to .gitignore to prevent committing the tunnel token.
Deploy
docker compose up -dCheck the logs to confirm the tunnel connected:
docker compose logs cloudflaredYou should see output indicating successful connection:
2025-01-15T10:30:45Z INF Starting tunnel tunnelID=a1b2c3d4-5678-90ab-cdef-1234567890ab2025-01-15T10:30:45Z INF Registered tunnel connection connIndex=0 connection=12345678-abcd-1234-efgh-567890abcdef event=0 ip=198.41.192.1 location=ams01 protocol=quic2025-01-15T10:30:46Z INF Registered tunnel connection connIndex=1 connection=23456789-bcde-2345-fghi-67890abcdef1 event=0 ip=198.41.200.2 location=ams02 protocol=quic2025-01-15T10:30:47Z INF Registered tunnel connection connIndex=2 connection=34567890-cdef-3456-ghij-7890abcdef12 event=0 ip=198.41.192.3 location=fra01 protocol=quic2025-01-15T10:30:48Z INF Registered tunnel connection connIndex=3 connection=45678901-defg-4567-hijk-890abcdef123 event=0 ip=198.41.200.4 location=fra02 protocol=quicThe tunnel establishes 4 connections to Cloudflare’s edge network for redundancy and load balancing.
Now test your domain. app.yourdomain.com should route to your container.
Example 2: Kubernetes + Service (Cloudflare SSL)
For Kubernetes deployments where Cloudflare handles TLS termination, route traffic directly to Kubernetes services. This approach is similar to Docker Compose but with Kubernetes’ built-in high availability through multiple replicas.
Traffic flow:
- External client → Cloudflare edge
- Cloudflare edge →
cloudflaredpod (via tunnel) cloudflaredpod → Application service- Response follows the reverse path
Cloudflare terminates TLS at the edge and forwards HTTP traffic to the internal service.
Prerequisites
- Running Kubernetes cluster
kubectland Helm 3 installed- Cloudflare tunnel created (copy the tunnel token)
Deploy Application
Create a simple nginx deployment for testing:
kubectl create namespace demokubectl create deployment nginx --image=nginx:alpine --port=80 -n demokubectl expose deployment nginx --port=80 --target-port=80 -n demoVerify the service:
kubectl get svc -n demo nginxOutput shows the service ClusterIP (e.g., 10.104.47.162).
Configure Cloudflare Dashboard
In the tunnel’s Public Hostname settings:
- Subdomain:
app - Domain:
yourdomain.com - Service Type:
HTTP - Service URL:
http://nginx.demo.svc.cluster.local:80
The service URL uses Kubernetes DNS format: <service-name>.<namespace>.svc.cluster.local:<port>
Deploy Cloudflare Tunnel
# Add Cloudflare Helm repositoryhelm repo add cloudflare https://cloudflare.github.io/helm-chartshelm repo update
# Deploy the tunnelhelm upgrade --install cloudflare-tunnel cloudflare/cloudflare-tunnel-remote \  --namespace demo \  --create-namespace \  --set cloudflare.tunnel_token="your-tunnel-token"
Verify Deployment
kubectl get pods -n demokubectl logs -n demo deployment/cloudflare-tunnel-cloudflare-tunnel-remoteLook for successful connection logs:
INF Starting tunnel tunnelID=...INF Registered tunnel connection connIndex=0 ... protocol=quicINF Updated to new configuration config="{\"ingress\":[{\"hostname\":\"app.yourdomain.com\",\"service\":\"http://nginx.demo.svc.cluster.local:80\"}]...Test your domain: https://app.yourdomain.com should return the nginx welcome page.
Example 3: Kubernetes + Ingress (Cluster SSL)
For clusters with existing ingress controllers and cert-manager, route traffic through the ingress to maintain certificate independence from Cloudflare. This approach requires additional configuration but integrates with existing cluster infrastructure.
Traffic flow:
- External client → Cloudflare edge
- Cloudflare edge →
cloudflaredpod (via tunnel) cloudflaredpod → Ingress controller- Ingress controller → Application service
- Response follows the reverse path
The ingress controller terminates TLS using certificates managed by cert-manager, independent of Cloudflare.
Prerequisites
- Kubernetes cluster with ingress controller deployed (e.g., NGINX, Traefik)
kubectland Helm 3 installed- Existing application with ingress configured and TLS certificate
- Cloudflare tunnel created (copy the tunnel token)
Determine Ingress Controller IP
Find the cluster IP of your ingress controller:
kubectl get svc -n ingress-nginx ingress-nginx-controllerExample output:
NAME TYPE CLUSTER-IP EXTERNAL-IP PORT(S)ingress-nginx-controller LoadBalancer 10.96.45.200 192.168.1.100 80:30080/TCP,443:30443/TCPNote the CLUSTER-IP (e.g., 10.96.45.200) - you’ll need this for the Helm configuration.
Configure Cloudflare Dashboard
In the tunnel’s Public Hostname settings:
- Subdomain:
app - Domain:
yourdomain.com - Service Type:
HTTPS - Service URL:
https://app.yourdomain.com
Note: The service URL is the domain name, not an IP. The hostAliases configuration will resolve this to the ingress controller internally.

The Certificate Validation Problem
When routing through an ingress controller with cluster-managed certificates, a DNS resolution issue arises:
- The ingress terminates TLS with a certificate for
app.yourdomain.com - TLS requires the hostname to match, not an IP address
- But
app.yourdomain.comresolves externally to Cloudflare’s edge IPs - We need the
cloudflaredpod to resolve it to the internal ingress IP instead
Solution: Use Kubernetes hostAliases to override DNS inside the pod:
- Map
app.yourdomain.com→10.96.45.200(ingress controller IP) in/etc/hosts - When
cloudflaredconnects tohttps://app.yourdomain.com, it resolves to the internal ingress while presenting the correct hostname for TLS validation
Modify Helm Chart
The upstream cloudflare-tunnel-remote chart doesn’t support hostAliases. You need to modify the chart by copying it locally or forking it.
Required modification to templates/deployment.yaml:
Add hostAliases in the pod spec (after line containing serviceAccountName):
spec: template: spec: hostAliases: - ip: { { .Values.tunnelConfig.ipAddress } } hostnames: - { { .Values.tunnelConfig.hostName } } serviceAccountName: { { include "cloudflare-tunnel-remote.serviceAccountName" . } } containers: - name: cloudflared # ... rest of container specAdd to values.yaml:
tunnelConfig:  ipAddress: '10.96.45.200' # Your ingress controller cluster IP  hostName: 'app.yourdomain.com' # Domain matching your public hostname
cloudflare:  tunnel_token: '' # Your tunnel token
Deploy with Helm
Deploy using your modified chart:
helm upgrade --install cloudflare-tunnel ./cloudflare-tunnel \ --namespace ingress-system \ --create-namespace \ --values cloudflare-tunnel/values.yamlVerify Deployment
kubectl get pods -n ingress-systemkubectl logs -n ingress-system deployment/cloudflare-tunnelLook for successful connections:
INF Starting tunnel tunnelID=...INF Registered tunnel connection connIndex=0 ... protocol=http2INF Updated to new configuration config="{\"ingress\":[{\"hostname\":\"app.yourdomain.com\",\"service\":\"https://app.yourdomain.com\"}]...The “Updated to new configuration” line confirms the service routing is configured. With hostAliases, the domain resolves internally to your ingress controller.
Test your domain: https://app.yourdomain.com should route through: Cloudflare edge → tunnel → ingress → your application.
Why Route Through Ingress Instead of Directly to Services
This setup routes traffic from cloudflared → ingress controller → services, rather than directly to service IPs. The reasons:
- Certificate independence: The ingress controller manages TLS certificates (via cert-manager or manual configuration), keeping certificate lifecycle independent from Cloudflare
- Existing ingress rules: Applications already exposed via ingress continue working without modification
- Consistency: Same routing logic applies whether traffic arrives from the tunnel or another source (e.g., internal cluster access)
- TLS termination: The ingress controller terminates TLS using its own certificates, avoiding certificate validation issues when routing to plain IP addresses
The hostAliases configuration allows cloudflared to resolve the domain name to the ingress controller’s cluster IP. When Cloudflare forwards a request to https://app.yourdomain.com, the tunnel resolves it to the ingress controller IP (e.g., 10.96.45.200), which then routes it according to existing ingress rules.
Routing through the ingress controller adds an extra network hop compared to direct service routing, which may introduce minimal additional latency. For most applications, this overhead is negligible compared to the benefits of maintaining certificate independence and routing consistency.
Security Considerations
Token management:
- The tunnel token authenticates the connection to Cloudflare’s edge
- For Docker: Store in
.envfiles excluded from version control - For Kubernetes: Use Sealed Secrets, external secret operators (e.g., External Secrets Operator, Vault), or similar secret management solutions instead of plain Kubernetes Secrets
- Rotate tokens periodically since a compromised token allows unauthorized traffic routing through your tunnel
Firewall requirements:
- Outbound connections on port 7844 must be allowed
- No inbound port requirements
Application security:
- Cloudflare Tunnel does not replace application-level security
- Applications remain responsible for input validation, authentication, and authorization
- In Kubernetes, consider using additional NetworkPolicies to restrict which services the tunnel can reach
Troubleshooting
Tunnel fails to connect with QUIC timeout errors:
ERR Failed to dial a quic connection error="failed to dial to edge with quic: timeout: no recent network activity"This might mean UDP port 7844 is blocked. By default, cloudflared uses QUIC over UDP for optimal performance. If your network blocks UDP, you need to force HTTP2 over TCP instead. Modify your Helm chart’s templates/deployment.yaml to add the --protocol http2 flag:
command: - cloudflared - tunnel - --no-autoupdate - --metrics - 0.0.0.0:2000 - --protocol # Add these two lines - http2 # to force TCP instead of UDP - runRedeploy the chart for changes to take effect. This is needed in corporate environments or networks with strict egress filtering.
Tunnel connects but traffic doesn’t route:
- Check the “Updated to new configuration” log line - it shows your service routing
- Verify the service URL in Cloudflare dashboard matches your actual service
- For Kubernetes: Test service connectivity from within cluster:
kubectl run -it --rm debug --image=busybox -- wget -O- http://service-name.namespace.svc.cluster.local:portTLS certificate errors (Example 3 - Kubernetes + Ingress):
- Confirm
hostAliasesIP matches ingress controller cluster IP - Verify the domain in
tunnelConfig.hostNamematches the Cloudflare dashboard configuration - Check ingress controller has valid TLS certificates for the domain
- Ensure ingress exists for the domain:
kubectl get ingress -A | grep yourdomain
Wrong token or tunnel deleted:
- Logs show
ERR Failed to authenticateorERR Tunnel not found - Verify token is correct and tunnel still exists in Cloudflare dashboard
- Regenerate tunnel token if needed
Conclusion
Cloudflare Tunnel provides a method to expose applications from private networks without requiring inbound firewall rules or public IP addresses. The outbound-only connection model eliminates traditional security concerns associated with exposing services directly to the internet.
Three deployment patterns cover different use cases:
- Docker Compose: Ideal for single-host setups, development, and testing
- Kubernetes + Service: Simple Kubernetes deployments with Cloudflare-managed TLS
- Kubernetes + Ingress: Advanced setups maintaining cluster-controlled certificate lifecycle
Choose based on your infrastructure:
- Use Example 1 or 2 for simplicity and Cloudflare-managed certificates
- Use Example 3 when integrating with existing ingress controllers and cert-manager
- All three avoid the complexity and security risks of traditional port forwarding
The choice depends on operational requirements, existing infrastructure, and certificate management preferences.
This article presents deployment patterns for Cloudflare Tunnel based on practical implementations in both Docker and Kubernetes environments, demonstrating different approaches to certificate management and traffic routing.